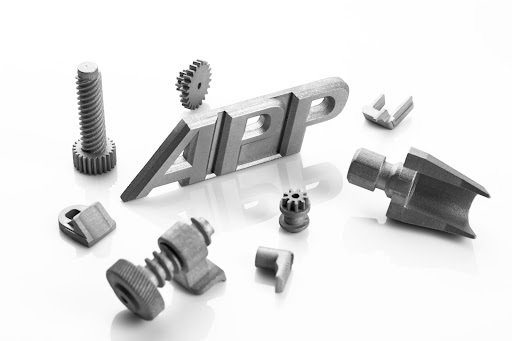
To launch new mechanical products on time and on budget, development teams must be able to iterate through designs as they optimize manufacturability and ensure their device or assembly performs as intended. This is especially true for small and complex metal components, which can be difficult to produce and hard to scale.
MIM manufacturing, used across a range of industries, efficiently produces medium to high-volume components with dedicated tooling. It is a cost-effective alternative to machined components, delivering high levels of mechanical performance, dimensional stability, scalability, and cost competitiveness.
However, while MIM is optimized for high-volume production, qualifying a MIM component can cost tens of thousands of dollars and take three to six months. This extended development time is an issue for design engineers who need to test components in weeks rather than months. The traditional solution is to source machined prototypes. The downside to this approach is that it leads to other problems down the road when converting from a high-cost, machined prototype to a MIM production component.
Binder jet 3D metal printing is an additive manufacturing (AM) process that rapidly produces prototype components, allowing engineers to test their designs quicker than ever before. Equally important is that the MIM process and the binder jet 3D metal printing process share many similarities and complement each other as component manufacturing technologies.
Let's first look at these two processes, then compare them.
Metal injection molding combines the most useful characteristics of powder metallurgy and plastic injection molding to produce small, complex-shaped metal components with outstanding mechanical properties. As a general rule, MIM parts weigh less than 100 grams, feature complex geometries and tight tolerances, and can fit in the palm of a hand.
The MIM process begins by mixing a combination of 5-to-25-μm metal powder with polymers to form a feedstock. This feedstock is then molded into an oversized, geometry-specific tool at high pressures and temperatures between 120° and 250°C.. In the next step, most of the polymer is removed from this ‘green’ part, using either a solvent or an oven incorporating a gas/solid reaction. Using a support ceramic, the part is then placed in a high-temp furnace (1300°-1400°C), where the remaining polymers are removed, and the geometry is sintered and densified into its final dimensions. The part can then be worked, heat treated and surface finished like any other piece of solid metal.

Binder jet 3D metal printing is an advanced AM technology that also uses powdered metals but builds a 3D component by applying very thin, evenly distributed layers of powder. This layer-by-layer approach gives designers outstanding flexibility because they are not reliant upon machining or tooling to form complicated geometries.
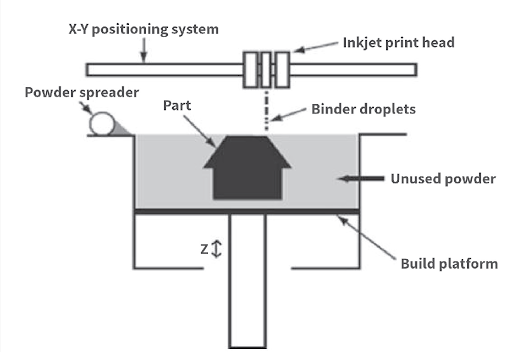
The process starts by vibrating a 10-to-20-μm metal powder—identical to the powder used in MIM feedstock formulation—onto a build platform. This layer of powder is “glued” together with an inkjet head that feeds a binder in a controlled 2D pattern. The bed of powder is lowered by 50-100 μm and a successive layer of powder is vibrated and spread onto the bed, and then glued together. These steps are repeated until the complete part is created, its geometry built from successive layers. A 1-cm-high part consists of 100 to 200 layers of powder that are glued together.
This glued part is then removed from the powder bed and placed in a furnace. The glue is removed thermally, and the geometry is sintered, shrinks, and densifies into final dimensions at high temperatures similar to the MIM process. Like its MIM counterpart, the 3D-printed part can be worked, heat treated, and surface finished.
Process Comparison
Binder jet 3D printing does not rely on custom tooling, so 3D-printed part prototypes can be produced rapidly and delivered in days rather than months. Binder jet 3D printing is not suitable for high-volume production runs, where MIM excels, but both processes will use the same sintering parameters and downstream infrastructure for a given part. The difference in surface finish printed parts relative to MIM can be addressed with secondary processing and surface finishing if needed.
Accelerating MIM Process Development
Printed part prototypes can be fabricated quickly, then used for test builds, and can easily be fabricated again if tests result in design modification; this is also true for traditional machined prototypes. However, because the binder jet process uses the same powder and sinter similar to their MIM counterpart, the manufacturing process begins to be defined while the MIM tool is being built. In some cases, the printed components may prompt a design change of the MIM process for enhanced manufacturability, such as incorporating a flat surface to prevent distortion.
Bridging the Development Gap
Binder jet 3D metal printing is the ultimate bridge between prototype fabrication and MIM production, as both processes use the same materials and downstream equipment. Metal 3D printing delivers prototype development speed and design flexibility. When used in conjunction with MIM, 3D printing not only saves time and money while creating functionally identical prototypes but also accelerates defining the MIM manufacturing details.